 So a couple of days before Christmas, I decided it was as good a time as any to undertake a large wall stenciling project at our new mountain cabin. Never mind we had guests coming into town, or meals to plan, or gifts to wrap. If you’ve been reading my blog at all you know that DIY projects are not a main feature, as I typically opt to have SEDI (Someone Else Do It) instead. Nevertheless, I had a bare wall that was calling my name, it’s just paint after all, and how hard could it be? Since my skill level in the area was low, I prepared by myself as best I could by reading blogs and watching YouTube videos. From what I gathered, painting a wall stencil is a delightful way to while away an afternoon. One chipper gal from a website I can’t recall (but I think she was selling stencils) even boasted of having stenciled her office in an hour.
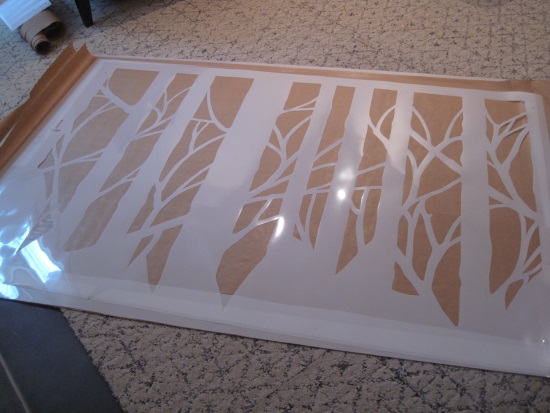
The wall in question was in the den, which is a small and nearly windowless room that gets little natural light and no view. Which is fine because we’re planning to use the room mainly for watching TV anyway. In keeping with the mountain locale, I wanted to do a forest-themed stencil to lend the space more visual interest and depth. I ordered this one called “Bare Trees” from The Stencil Library:

The Stencil Library is a British company, and it took about a week to receive it from England. I’m not gonna lie, it was kind of pricey, about $250 USD. But the main advantage in my mind was that the full-wall version comes in three large pieces, which span about 5′ wide by 8′ tall in total. I figured the fewer pieces I had to move around, the easier it would be. Plus I just really liked the “Bare Trees” pattern which actually resembles the forested hillside surrounding our cabin. Another stencil company offers a Birch Trees stencil which is also nice (and less expensive) and it seems to be a blogger favorite.

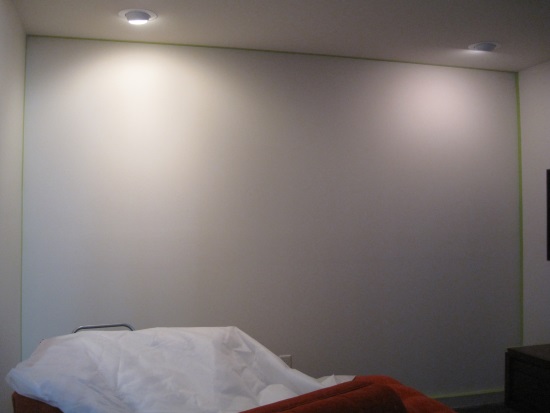
Here’s the den wall before I got started. Fortunately (or strategically) this wall has no weird angles, doorways or trim to work around.
I assembled all of the materials I understood I would need based on my research: latex paint, mini-rollers, painter’s tape, small paint trays, and spray adhesive. Because the Bare Trees stencil is a “reverse pattern” – you paint the spaces between the trees, rather than the trees themselves – I decided to use a light gray paint color for the background and leave the trees the current wall color, which is off-white.
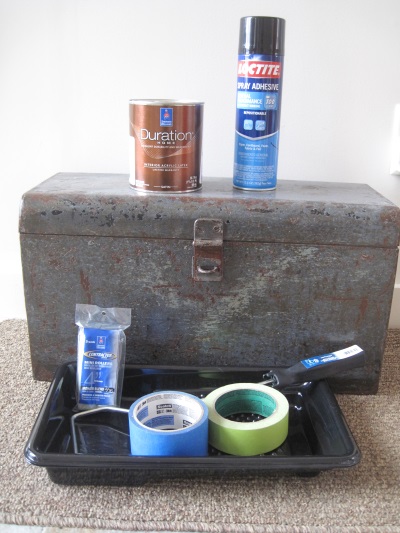
Here are the supplies I was told I would need. These are not necessarily the supplies I actually used. More detail in a moment…
Step 1: Wall Prep. I taped off the walls, ceiling, and base trim surrounding the area to be stenciled and moved the furniture out of the way. Since the ceiling is just under 8′ tall, I was able to get away with using a step-stool rather than a ladder. So far, so good.
A little prep with painter’s tape will save you headaches later!
Step 2: Position the first stencil in place. Here’s where it got challenging. Everything I read about stenciling suggested using re-positionable spray adhesive on the back of the template to adhere it to the wall. As I stared at my first stencil, roughly the size of a classroom map, I tried to imagine how that would go: so I just spray the template in the garage and then somehow maneuver the sticky sheet, billowing in the wind, back inside, down a flight of stairs, and up onto the wall and get it perfectly positioned, flat and straight?
This is one big-ass stencil.
Maybe this idea would work with a smaller template, or if I had a team of expert stencil maneuverers at my disposal. But this was not a DIT (Do It Together) project it was DIY, and I was alone and I was smaller than the stencil. What I envisioned is, even if the stencil survived the trip without adhering to itself in a sticky mylar mass and without trapping me inside like an insect caught in a web, it would most certainly not magically adhere straight and flat on the wall with only my insufficient arm span to finagle it into place. So I wisely decided that painters tape, lots and lots of painters tape, was the way to go.
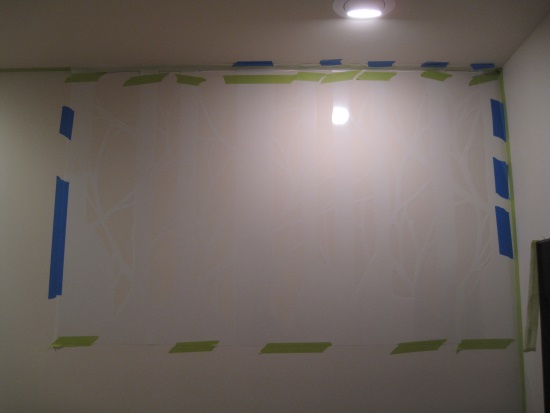
Even using painter’s tape, it was a PIB to get the stencil arranged level and flat along the wall. Probably took about a half hour just to tape it up…which further reinforced my decision on NOT using spray adhesive.
3. Start Painting. Everything I read suggested that small paint rollers would make the job faster and easier. And maybe rollers would work with a stencil that was firmly suctioned to the wall with spray adhesive. But with the template up such as it was, I knew I needed more control than a roller would give me, so I opted to hand-paint the whole thing with a brush. This definitely made the project more laborious than it would have been.

Because I taped the stencil to the wall at the top of each tree, I found myself having the constantly move and re-position tape in order to paint behind it. Plus at the ceiling level I was working above my head. Literally a pain in the neck!
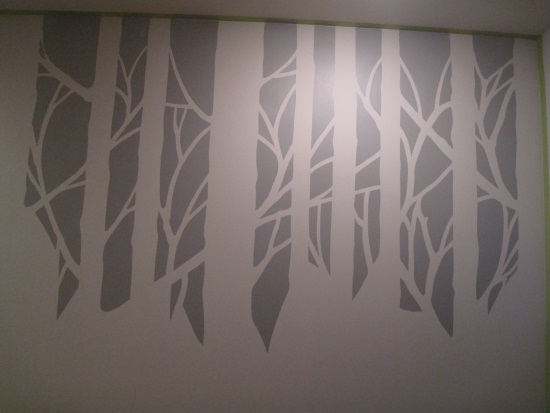
One down, six to go.
Since the stencil kit came with three 5′ wide templates which stacked vertically, and the wall was only 10′ wide, I only had to paint a total of six templated areas. This was the one advantage of the larger templates, but I’m not sure if that outweighed the difficulties. I applied two coats of eggshell-finish paint to the painted areas, taking care to use as “dry” of a brush as possible around the edges. When I pulled the templates off, there was very little bleeding around the edges, but the dried paint on the template did pull off bits of the original wall paint color, leaving some “chipped” looking areas. It’s not noticeable from more than three feet away and would be fairly easy to go back and touch up. One lesson learned: in the future I would probably use flat paint instead of eggshell, because it’s easier to blend in the touch-ups later. The whole project spanned six days, but part of that was over Christmas and I was not working the whole time. I would estimate it took 12-14 hours in total.
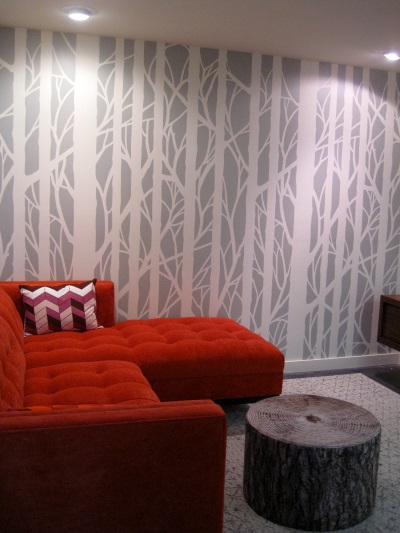
Here’s the completed room. Though the process was more painful than promised, I’m happy with the way it turned out.The nice thing about using an organic motif like this one is you can’t even see little irregularities and tiny goofs.
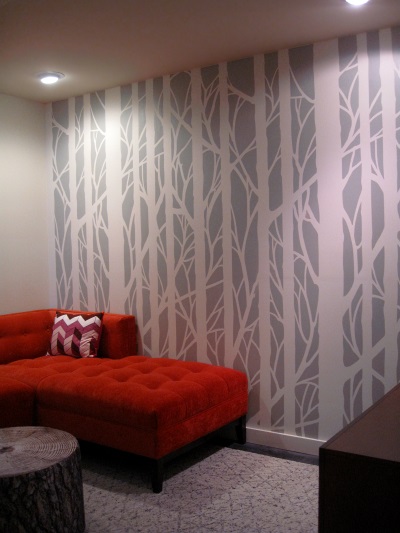
And here’s the wall from the other angle. I do really like the bright orange sofa against the soft gray and white wall.
It’s December 31st today, so I guess I just barely got my once-annual DIY project done this year! I hope you’ll find my experiences helpful if you’re considering painting a wall stencil in 2014. Please feel free to leave any questions in the comments. Happy New Year!
———-
Tamara Leicester is a licensed interior designer and owner of Tamara Heather Interior Design, LLC. She designs casually elegant interiors with an artistic sensibility, often drawing upon the talent of local artists and craftspeople in her work. Dreaming about updating your space? Learn more at tamaraheatherinteriors.com.